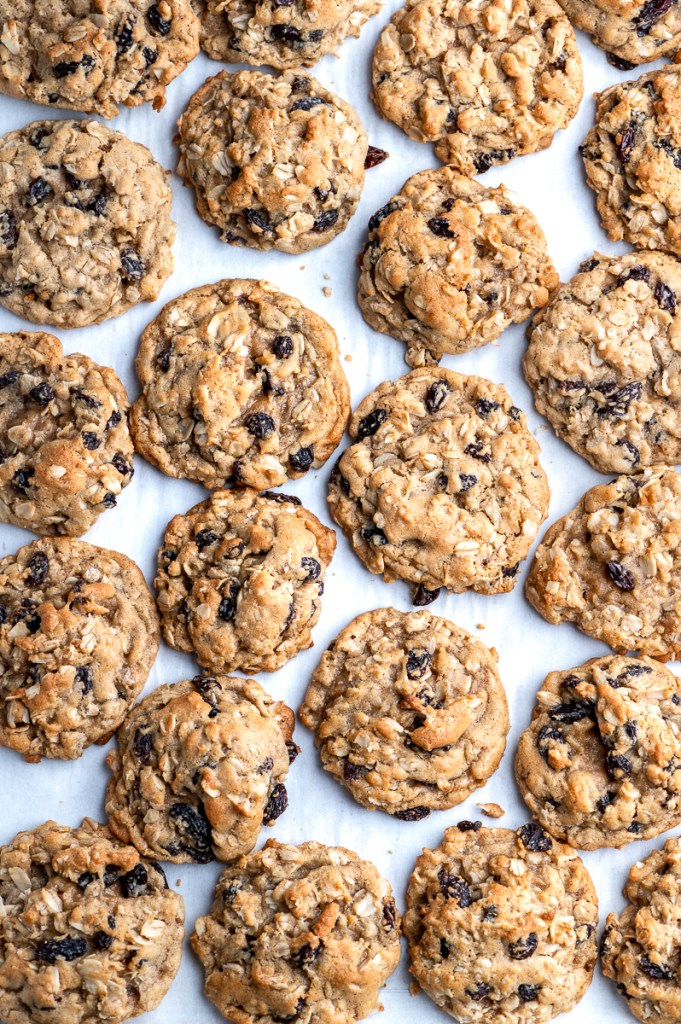
Root Vegetable Stuffing

I have made this stuffing recipe a handful of times over the years and am just now getting it on my website! I never liked stuffing growing up and I didn’t know why. As I got older, I realized I really didn’t like the flavor profile of sage, and that is the predominant herb in most packaged stuffings. In my quest to find a non-sage stuffing option I came across this recipe from Giada and it was a hit. Chock full of vegetables and not a hint of sage to be had.

  • 5 1/2 tablespoons unsalted butter, (at room temperature, (2 of the tablespoons cut into 1/2-inch pieces))
  • 3 tablespoons extra-virgin olive oil
  • 4 medium carrots, (peeled and cut into 1/2-inch cubes)
  • 3 medium parsnips, (peeled and cut into 1/2-inch cubes)
  • 2 large leeks, (white and pale green parts only, thinly sliced)
  • One 1-pound butternut squash, (halved, peeled, seeded and cut into 1/2-inch cubes)
  • 1 teaspoon kosher salt
  • 1/2 teaspoon freshly ground black pepper
  • 2 tablespoons chopped fresh thyme leaves
  • 1 teaspoon ground allspice
  • 2 Granny Smith apples, (unpeeled, cored and cut into 1/2-inch cubes)
  • Zest of 1 large lemon
  • 8- ounce loaf sourdough bread, (cut into 1/2-inch cubes (about 6 cups))
  • 3 large eggs, (at room temperature, beaten)
  • 1 1/2 cups (6 ounces) dried cranberries
  • 1/4 cup frozen apple juice concentrate, (thawed)
  • 3/4 cup vegetable stock
  • 5 ounces (2/3 cup goat cheese) coarsely crumbled, optional

Preheat the oven to 375 degrees. Grease a 9×13 glass or ceramic baking dish with 1 tablespoon of the butter. Grease a 12×15 piece of foil with 1/2 tablespoon of the butter. Set aside. In a large nonstick skillet over medium-high heat, melt 2 tablespoons of the butter and 2 tablespoons of the olive oil. Add the carrots, parsnips, leeks, butternut squash, 1/2 teaspoon salt and 1/4 teaspoon pepper. Cook stirring frequently, until the vegetables start to soften, about 15 minutes. Add the remaining olive oil, the remaining 1/2 teaspoon salt and 1/4 teaspoon pepper, the thyme, allspice, apples and lemon zest. Cook for 5 minutes. Remove the skillet from the heat and cool slightly. In a large bowl, toss together the bread cubes and eggs until coated. Add the cranberries and apple juice concentrate. Add the vegetable mixture and toss to coat. Place the mixture in the prepared baking dish and sprinkle the remaining butter pieces on top. Pour the vegetable stock over the top and cover the baking dish with foil, buttered-side down. Bake for 40 minutes. Remove the foil and continue to bake until the top is slightly crisp and brown in spots, 20 to 25 minutes longer. Let the stuffing rest 10 to 15 minutes. Sprinkle the goat cheese on top if using, and serve.

Lemon Ricotta Cookies

I found this recipe years ago and saved it on Pinterest but somehow never got around to adding it to my site. That oversight is now fixed and I don’t have to scroll through my Pinterest boards trying to find it any longer! The ricotta makes these cookies so soft, and the lemon flavor is just enough without being overpowering. It is a hit to whatever gathering I bring it to! Recipe and photo courtesy of justalittlebitofbacon.com.

Cookie

  • 2 cups all purpose flour
  • 1/2 tsp baking soda
  • 1/2 tsp table salt
  • 8 tbsp unsalted butter, cool room temperature
  • 1 cup granulated sugar
  • 1/2 cup ricotta, whole or part skim
  • 1 large egg
  • lemon zest from one lemon

Lemon Glaze

  • 1 tbsp cream cheese, room temperature
  • 3 tbsp lemon juice
  • 2 cups (8 oz) confectioners’ sugar
  • 3 tbsp colored sugar, optional

Whisk together flour, baking soda, and salt in a medium bowl. Set aside. In a standing mixer with the flat beater, cream the butter and sugar together on medium-high until light and fluffy, 3-4 minutes. With the mixer on medium, add the ricotta, egg, and lemon zest mix until thoroughly blended. Pour in the flour mixture and mix on low until just blended, but with some dry flour remaining. Use a large silicone spatula to give the dough a couple of quick turns. Transfer the dough to the refrigerator and chill for 20-30 minutes.

While the cookies are chilling, preheat the oven to 350. Using a medium cookie scoop, fill your cookies sheets, keeping in mind that these cookies won’t spread very much. Bake for 11-12 minutes, or until you see the edges just starting the brown. The tops won’t look very dark, but you want the bottoms to lightly brown. Let them cool on the pan for about 5 minutes, then move to a cooling rack.

Once the cookies have cooled, whisk together your glaze ingredients and dip the tops of the cookies into the glaze. You want the glaze to be on the thinner side, but not runny. Sprinkle with sanding sugar if desired.

Peach Salsa

My son’s football team had a peach fundraiser this past summer and as a result we ended up with over 30 pounds of peaches to be processed. While some turned into canned peaches and peach pie, my husband found this peach salsa recipe and it was seriously good. I’ve continued buying peaches while they are still in season so we can enjoy it until the very last minute. My family doesn’t like spicy things so this salsa is mild, but you can easily make it spicier by incorporating different peppers or including the seeds.

  • 3 ripe, peeled peaches, about 2 cups
  • 1/2 red onion, finely chopped
  • 1 jalepeno, seeded and minced (leave the seeds if you want more heat)
  • 1/2 cup finely chopped peppers (we have used Anaheim or shishito)
  • Juice of 1 lime
  • 1 tbs agave or honey
  • Salt and pepper to taste

Combine the peaches, red onion and peppers in a medium bowl. Whisk together the lime juice and honey/agave. (I like to heat up this mixture to loosen the honey so it incorporates better.) Gently stir in the lime juice mixture. Season with salt and pepper. Let it it sit for 5-10 minutes to marinate the flavors and enjoy! This salsa is perfect for chicken or fish, but we enjoy it best with tortilla chips. Store in the fridge for up to two weeks.

Middle Eastern Inspired Chicken Kabobs

We have done a fair amount of hosting this past fall and having quick finger foods people can munch on is one of my favorite things to have on the buffet. I found these kabobs on Pinterest and the recipe came together quickly and tasted delicious. Just make sure you leave enough time for the skewers to marinate. Recipe and photo courtesy of onceuponachef.com.

For the Marinade:

  • 1 cup plain whole milk Greek yogurt
  • 2 tablespoons extra-virgin olive oil
  • 2 teaspoons paprika
  • 1/2 teaspoon cumin
  • 1/8 teaspoon cinnamon
  • 1 teaspoon crushed red pepper flakes (reduce to ½ teaspoon for less heat)
  • Zest from one lemon
  • 2 tablespoons freshly squeezed lemon juice
  • 1 3/4 teaspoons salt
  • ½ teaspoon freshly ground black pepper
  • 5 garlic cloves, minced

For the Skewers:

  • 2 1/2 to 3 pounds boneless skinless chicken thighs, trimmed of excess fat and cut into 1½-inch pieces
  • 1 large red onion, cut into 1-inch chunks

In a medium bowl, combine the yogurt, olive oil, paprika, cumin, cinnamon, red pepper flakes, lemon zest, lemon juice, salt, pepper and garlic. Line a baking sheet with aluminum foil for easy clean up. Thread the chicken onto metal skewers, folding if the pieces are long and thin, alternating with the red onions. (You can use wooden skewers, just be sure to soak them for 30 minutes before using). Be sure not to cram the skewers. (Note: You’ll need between 6-8 skewers.) Place the kabobs on the prepared baking sheet. Brush the marinade all over the meat, coating well. Cover and refrigerate at least eight hours or overnight. Preheat the grill to medium-high heat. Make sure to grease your grill with Pam or vegetable oil before putting your skewers on. Grill the chicken kabobs until golden brown and cooked through, turning the skewers occasionally, 13 to 15 minutes. (The yogurt marinade makes these kabobs prone to sticking to the grill grates; if necessary, use a metal BBQ spatula to scrape underneath the kabobs and release them.) Transfer the kabobs to a platter and serve.

Guacamole

I’m not typically a huge guacamole fan, but we were hosting friends for dinner and I wanted to have some dip options so after a quick Google search I found this recipe. It was delicious and I ate more of it than I ever do of a guacamole recipe so here it goes onto the website. Recipe and photo courtesy of loveandlemons.com.

  • 3 avocados, ripe
  • 1/4 cup diced onion (red or white is fine)
  • 1/4 cup finely chopped fresh cilantro
  • Zest and juice of 2 limes
  • 1 small jalapeño pepper, diced
  • 1/2 teaspoon sea salt, plus more to taste
  • 1/2 teaspoon ground cumin,
  • optional: 1 to 2 Roma tomatoes, seeded and diced

In a large bowl, combine all ingredients except the tomatoes and mash with a fork until all ingredients are combined, but not completely smooth. Fold in the tomatoes if using. Season to taste and serve immediately.

Flourless Secret Ingredient Chocolate Cake

I saw this recipe on my Instagram feed, and since I was craving chocolate figured it was worth the shot. If you are intrigued by what the secret ingredient is I’m about to blow your mind. It’s BLACK BEANS! The recipe comes together super fast in a blender/food processor and doesn’t taste like beans in the slightest. I made our version with vegetable oil, but next time I’m going to try butter. This time I paired it with the one minute frosting from my Depression Cake, which was delicious, but perhaps a tad too rich so I’ll switch to a lighter frosting when I make it again. Recipe and photo courtesy of thepancakeprincess.com.

  • 1 15.5 oz can black beans, drained and rinsed* or 1 3/4 cups cooked black beans
  • 3/4 cup granulated sugar
  • 4 large eggs
  • 5 tablespoon melted butter or oil of your choice
  • 1 tablespoon vanilla extract
  • 5 tablespoon cocoa (Dutch-process preferred)
  • 1 teaspoon baking powder
  • 1/2 teaspoon baking soda

Preheat oven to 350F. Grease and line 2 6-inch round cake pans* with parchment paper. In a high speed blender or food processor, puree the beans, sugar, oil, eggs and vanilla until completely smooth. Add the cocoa powder, baking powder and baking soda directly to the blender and blend until smooth. Divide batter equally into prepared pans and bake for 30-35 minutes, or until the top springs back. Let cool for 5 minutes before flipping the cake onto a cooling rack. Make the frosting as the cake cools completely. Frost with the frosting of your choice.

*If you are like me and don’t have two 6″ pans, you can use a 8×8 or 9×9 and it works just as well.

Homemade Dog Treats

It’s the beginning of 2025 and in -apparently- long standing tradition I’m ready to upload a bunch of recipes that I’ve been making over the last several months. I don’t know how it has evolved to this cadence but at this point I’m just going to embrace it and finally get some stuff posted. Hurray! The first recipe (and photo) is one for homemade dog treats and it comes from one of my favorite websites, cookiesandcups.com. You can make them into any shape you want; over Christmas I cut them into miniature holiday shapes; but this does take longer to do so basic squares also works great.

  • 1/2 cup pumpkin or applesauce (my pups love both kinds)
  • 1/4 cup peanut butter*
  • 2 tablespoons coconut oil, measured in liquid state
  • 1 cup whole wheat flour (or 1 1/4 cups all purpose flour)
  • 1/4 cups quick oats
  • 1/2 teaspoon baking soda

Preheat your oven to 350 and prepare a cookie sheet with parchment paper. Combine all ingredients in a bowl, or stand mixer, and mix until the dough comes together. Turn out on to a lightly floured, flat surface and roll into a rough rectangle approximately 1/4″ thick. Cut into any shape you like, re-rolling the dough as many times as needed to use it all up. The shapes won’t really spread so you can pack in as many as you think will fit on the sheet. Bake for 17-20 minutes, depending on the size of the treat. You want them to be well baked and crunchy. Let them cool completely and then set out overnight so they dry out before storing them in an airtight container.

*If you use natural peanut butter then your dough will be drier so just pay attention and use a little less flour if needed. You want it to be able to stay together when you roll it out.

How To: Homemade Fruit Leather

Summer is here and my strawberry bed is full of delicious fruit. One of my most favorite ways to use them up is with this fruit leather recipe. It is so simple and delicious that you won’t mind skipping the store bought stuff! While the recipe is simplicity itself, I will include a couple of things I’ve learned along the way to make storing it a breeze.

  • 3 cups strawberries*
  • 3 tablespoons sweetener of your choice (I usually use sugar, but it works equally well with honey or maple syrup)
  • 2 tablespoons lemon juice

Preheat your oven to the lowest possible setting, in my case that is 170 degrees**. In a blender, puree the strawberries, sugar and lemon juice until completely combined. Line rimmed baking sheets with parchment paper and pour your mixture on in a thin layer; I use an offset spatula to get an even layer. You will probably need two or three baking sheets depending on their size. Place in the oven and bake for at least 2 1/2 to 3 hours depending on how thick a layer you are dehydrating. You will know the leather is dry when it is no longer sticky to the touch. When you take it out of the oven, roll the parchment paper long ways so you can cut servings straight from the roll. This will give you parchment paper-lined strips that unroll just like the store bought ones. If you don’t want to store them rolled you can cut strips on a cutting board and store in an airtight container. I like to store mine in the fridge, but you don’t have to.

*If you have other fruit languishing in your fridge you can absolutely mix and match for different flavor combinations.

**I have also used my dehydrator to make these, if that is a option for you cook at 140 for about 5-6 hours, making sure to line your trays with parchment.

Skillet Chicken Pot Pie

I had some chicken thighs I needed to use up, but it’s February and so something warm and filling was called for. This recipe is nice because it uses one pan and you don’t have worry about fiddling with a pie crust. Recipe and photo courtesy of castironskilletcooking.com

For the Filling:

  • 1 1/2 lbs cubed and cooked chicken (I used chicken thighs)
  • 1 bag frozen, mixed veggies
  • 1/2 cup flour
  • 1 1/4 cup chicken broth
  • 1/2 cup whole milk
  • 1/2 onion, diced
  • 3 cloves garlic, minced
  • 2 tablespoons butter
  • 1 teaspoon salt
  • 1 teaspoon parsley
  • 1/2 teaspoon pepper, garlic, onion, powder and oregano
  • 1/2 cup shredded cheese, optional

For the Biscuits:

  • 1 3/4 cup flour
  • 1 tablespoon baking powder
  • 1/2 teaspoon salt
  • 4 tablespoons frozen butter, grated
  • 3/4 cup buttermilk

For the filling, saute onion and garlic in butter until soft. Stir in seasonings and flour. Add milk and broth, stir until it thickens—about 5 minutes. Stir in veggies, chicken, and cheese, remove from heat. For the biscuits, combine flour, baking powder, and salt. Stir in butter until everything is mixed well. Add milk and mix well. Once the dough holds together, transfer to a lightly floured wooden cutting board. Flatten the dough out, then fold in half and flatten. Repeat 2 more times. Cut out biscuits using a cookie cutter or the rim of a cup. Set the biscuits on top of the filling and bake at 350°F for 30 minutes.

Peasant Bread

I was watching The Great British Baking Show the other day and it was Bread Week! After watching an hour of people making all these delicious loaves of bread I knew I had to make some for myself. I found this peasant bread on Pinterest years ago and for some reason never added it this site! I am rectifying this mistake finally because it such an easy, versatile bread that can be made in under 3 hours and shaped numerous different ways. This time I made a “faux”ccocia and it might be my new favorite way. I will note the different preparations in the description below. Recipe courtesy of alexandracooks.com.

  • 4 cups bread flour (all purpose works if that’s all you have)
  • 2 teaspoons kosher salt
  • 2 cups water, 105-110 deg*
  • 2 teaspoons sugar
  • 2 teaspoons instant yeast**
  • 2 tablespoons softened butter

In a large bowl whisk together the flour, salt, sugar and yeast. Add in the water, stirring until all the flour is absorbed. Cover the bowl with plastic wrap or a tea towel and leave to rise in warm place for at least an hour. (You can use the proving setting on your oven if you have it, otherwise, you can turn your oven on to 350, let it preheat for one minute, then turn it off. This will create a slightly warm environment for your bread.)

After your loaf has risen, preheat your oven to 425. There are multiple ways to bake this loaf: two greased 1 pound Pyrex bowls, one greased 2 pound Pyrex bowl, 1 greased 8×4 loaf pan and small Pyrex bowl. In this post I used a 9×13 greased cake pan to make a faux-ccocia bread and it’s definitely my favorite. When making the foccacia spread the dough out in a thin layer to fill the cake pan then use your fingers to create dimples in the bread. Drizzle with olive oil and sprinkle with coarse salt and any other herbs you like such as chopped rosemary. The combinations are endless!

The dough will be very sticky so keep that in mind when you are putting in your chosen baking dish. If you are using two greased 1 pound Pyrex bowls use two forks to help you separate the dough. After you have transferred the dough to your preferred pan, let it rise uncovered for another 20-30 minutes in a warm spot. Bake for 15 minutes at 425, then reduce the heat to 375 and cook for an additional 15-20 minutes. Turn it out of the bowls, if using, and let cool for 10 minutes before cutting.