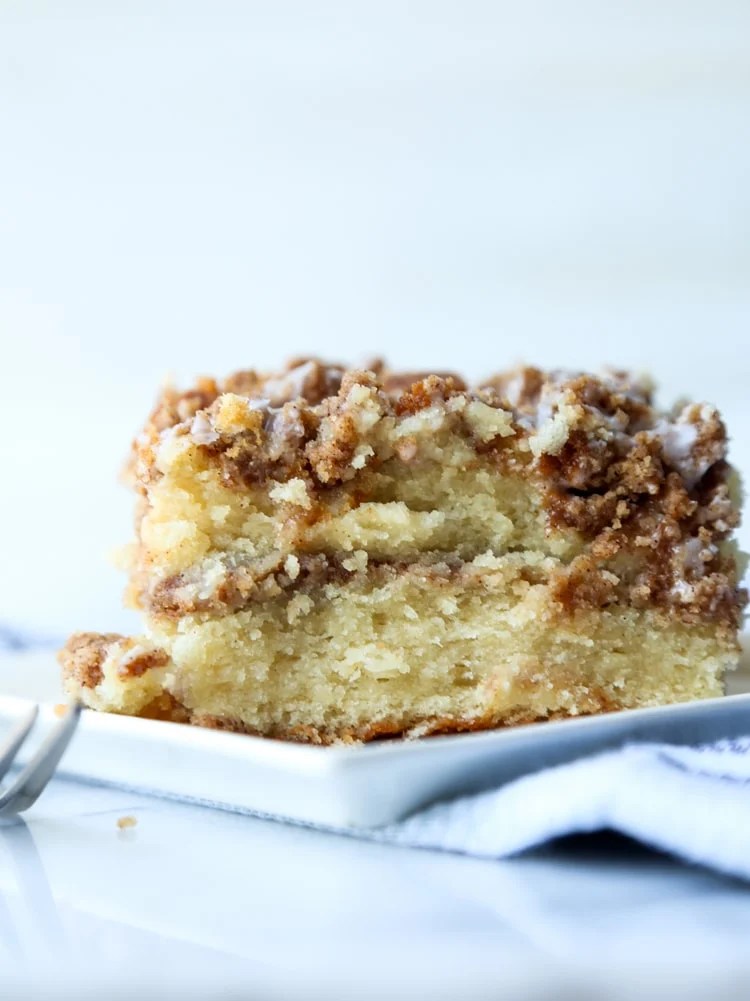
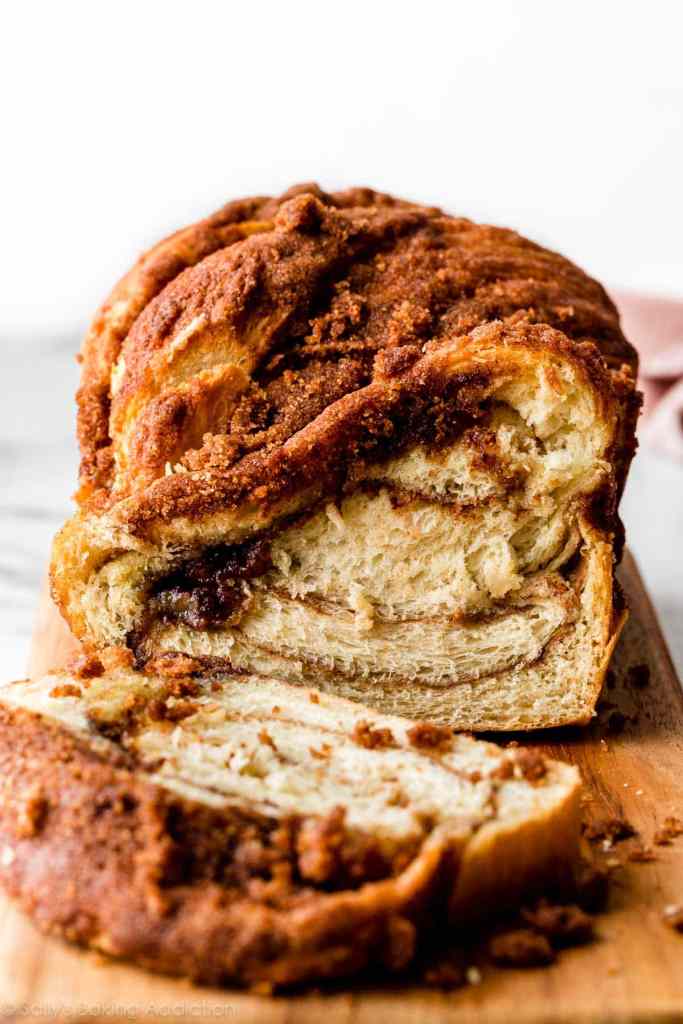
Homemade Granola

One of my husband’s favorite snacks is Greek yogurt with granola and blueberries. While we have tried many commercial mixes, including a really yummy one from a nice lady in Arizona, it was cost prohibitive to buy in the bulk we needed. Enter, The Pioneer Woman’s homemade granola recipe! I have been making Ree’s recipes for over 10 years now and they have not steered me wrong. This one is no exception. One of the things I like about it is it’s versatility; you can add/remove and tweak the recipe to make it your own.

  • 6 cups old fashioned oats (not quick oats)
  • 1/4 cup light oil (not olive)
  • 4 tablespoons butter, melted, plus more for greasing
  • 1 teaspoon salt
  • 1 cup brown sugar
  • 1/2 cup honey
  • 1/4 cup apple juice
  • 1/4 cup molasses
  • 3 teaspoons vanilla extract
  • 1 1/2 cup Rice Krispies
  • 1 cup wheat germ
  • 1/2 cup pecans, chopped
  • 1/4 cup almonds, slivered
  • 1 cup dried fruit of choice, optional

Preheat the oven to 350 degrees F. In a bowl, toss the oats with the oil, melted butter and salt. Spread the mixture out on 2 baking sheets and toast in the oven for 15 to 20 minutes, shaking the pan twice and making sure they don’t burn. Remove from the oven and set aside. Reduce the heat to 325 degrees F. In a medium saucepan, combine the brown sugar, honey, apple juice and molasses. Heat the mixture slowly, stirring until all combined. Stir in the vanilla. Toss together the toasted oats, rice cereal, wheat germ, pecans, almonds and fruit if using. Pour in the sugar mixture, stirring as you pour. Toss to combine; it will be sticky. Press into 1 baking sheet (thoroughly greased with butter, or line pan with foil and grease foil) and bake until golden, about 20-25 minutes. Remove from oven and let cool. As it is cooling I like to start breaking it up into small pieces as my husband doesn’t like big chunks of granola. The longer you let it sit as it cools the crunchier it will get and be harder to break into pieces. Store in an airtight container.

Elevated Cinnamon Rolls

A while back there was a trend on TikTok where you take the somewhat uninspiring tube of cinnamon rolls and jazz them up with extra heavy cream and butter and sugar and cinnamon. I made them one day when all my family was in town and they were so delicious I haven’t made them any other way since. At this point I figured it was high time to get it on the website so I don’t have to troll social media for the recipe any more. I have made this with frozen and refrigerated cinnamon rolls and both work great.

  • 2 cans cinnamon rolls
  • 1 cup heavy cream
  • 1 stick of butter
  • 1 tablespoon cinnamon
  • 3/4 cup light brown sugar

Preheat your oven to 350. Grease a 9×13 pan, then lay out your cinnamon rolls. In a microwave safe bowl, melt your butter. While your butter is melting, pour 1 cup of heavy cream all over the cinnamon rolls. Once your butter is melted, add the cinnamon and brown sugar and stir until well combined. Pour the mixture over the cinnamon rolls and then cover the dish with foil. Bake for about 45 minutes until the rolls are cooked and the cream is mostly absorbed. Serve with the icing that came in the tube.

Cinnamon Squares

Over the Christmas break I binge watched Magnolia Table on Discovery plus. One of the most intriguing recipes I saw was her cinnamon squares, which she described as the middle part of the cinnamon roll. I’m glad I watched her make it because if I hadn’t I might not have rolled them out properly. Make sure you use your rolling pin to really meld those layers so they don’t puff up too much in the oven. Also, the recipe makes a huge batch so I plan on freezing the leftovers in pairs to heat up later in the coming weeks.

For the Dough:

  • 1/4 cup warm water (105° to 115°F)
  • Two 1/4-ounce packets active dry yeast (I used 4 1/2 teaspoons of instant yeast)
  • 2 cups sugar
  • 1 1/4 cups milk, warmed
  • 8 tablespoons (1 stick) salted butter, melted and cooled, plus softened butter for the dough and pans
  • 2 large eggs, beaten
  • 1 teaspoon kosher salt
  • 6 cups all-purpose flour, plus more for dusting

For the Filling:

  • 2 cups pecan halves
  • 1/2 pound (2 sticks) salted butter, cut into pieces and chilled
  • 2 cups packed light brown sugar
  • 2 teaspoons ground cinnamon

In a large bowl, stir together the water, yeast, and 1 tablespoon sugar. Let stand until foamy, 3 to 4 minutes. Add the remaining sugar, milk, butter, eggs, and salt and stir with a wooden spoon until well blended. Add the flour and stir until the dough comes together. Rub softened butter on top of the dough and around the bowl. Cover and let stand in a warm spot for 1 hour. (If you use instant yeast, just put all the ingredients in the bowl and mix.) The dough will not rise very much.

To make the filling: In a food processor, combine the pecans, butter, brown sugar, and cinnamon and process until the mixture is well blended and paste-like (do this in two batches if necessary). Position a rack in the middle of the oven and preheat the oven to 350°F. Line a baking sheet with parchment paper. Generously dust a work surface with flour. Punch down the dough and place it on the work surface. Roll it out into a 16 x 24-inch rectangle.

Spoon two-thirds of the filling mixture over the dough. Spread it to cover the dough to the edges. Starting on a short side, fold the sheet of dough two thirds of the way, then fold the other side over in a tri-fold pattern, pressing the edges together, and roll it out a little bit, til you approximately a 14×16 rectangle. Spoon the remaining filling on top of the dough and spread it to cover the dough. Starting at a short side, tri-fold the dough again and lightly roll it back into a 12×18 rectangle. Use a chef’s knife to cut the dough into 24 roughly 3-inch squares. Arrange the squares on the prepared pan so that they are touching. Brush the tops of the squares with beaten egg.

Bake until lightly golden, 25 to 30 minutes. Serve hot. Store in an airtight container at room temperature for up to 2 days.

Elvis Granola

This is another Centr recipe that my husband really likes. It keeps for two weeks in an airtight container and is really good on Greek yogurt.

  • 1/3 cup peanut butter
  • 1/4 cup maple syrup
  • 2 teaspoons olive oil
  • 1 medium banana, peeled and lightly mashed
  • 2 cups rolled oats
  • 1/3 cup pecans, roughly chopped
  • 1/3 cup almonds, roasted and roughly chopped
  • 1/4 teaspoon salt

Preheat the oven to 320 and line a rimmed baking sheet with parchment paper. Blend peanut butter, maple syrup, oil and banana until smooth. In a large bowl combine oats, pecans, almonds and salt. Add the wet ingredients to the dry and mix well. Spread on baking sheet and bake, tossing 2-3 times for 20-25 minutes. Allow to cool, then break into smaller clusters and store in an airtight container.

Summer Strawberry Cake

I started following a food blogger named Smitten Kitchen about 6 months ago and one of the things I like about her is that she makes recipes with simple ingredients, but they have a sophistication to them that takes it to the next level. This recipe is one such example. Very simple, but very tasty. Add to that the fact that our strawberry harvest was excellent this past June and you have a winner.

  • 6 tablespoons butter, softened
  • 1 1/2 cups all purpose flour
  • 1 1/2 teaspoons baking powder
  • 1/2 teaspoon salt
  • 1 cup granulated sugar, plus 2 tablespoons for the top
  • 1 large egg
  • 1/2 cup milk
  • 1 teaspoon vanilla extract
  • 1 pound strawberries, hulled and halved

Preheat oven to 350. Butter a 10″ pie pan, or 9″ deep dish pie pan. Whisk flour or flours, baking powder and salt together in a small bowl. In a larger bowl, beat butter and 1 cup sugar until pale and fluffy with an electric mixer, about 3 minutes. Mix in egg, milk and vanilla until just combined. Add dry mixture gradually, mixing until just smooth. Pour into prepared pie plate. Arrange strawberries, cut side down, on top of batter, as closely as possible in a single layer (though I had to overlap a few to get them all in). Sprinkle remaining 2 tablespoons sugar over berries. Bake cake for 10 minutes then reduce oven temperature to 325°F and bake cake until golden brown and a tester comes out free of wet batter, about 50 minutes to 60 minutes. (Gooey strawberries on the tester are a given.) Let cool in pan on a rack. Cut into wedges. Serve with lightly whipped cream.

Toasted Coconut Dutch Baby

While I was visiting family in Dallas a couple of years ago I found a cookbook by the food blogger Joy the Baker. It said it was a celebration of butter and sugar and I can’t think of a better recipe to represent that than her toasted coconut Dutch baby. The Dutch baby is a cross between a pancake and a crepe and is baked in a piping hot cast iron skillet. It is so delicious it doesn’t even need syrup, although I like mine with a dollop of Cool Whip!

  • 1/4 cup sweetened shredded coconut
  • 2/3 cup flour
  • 1/8 teaspoon cinnamon
  • Pinch of salt
  • 3 large eggs, room temperature*
  • 1/3 cup granulated sugar
  • 2/3 cup whole milk
  • 1/4 cup butter

Place your cast iron skillet on a rack in the upper third of the oven and preheat to 400 degrees. Spread coconut in a thin layer in a skillet over medium heat and stir until the coconut starts to brown. Make sure to keep a close eye on this because it can go from toasted to burned in seconds! Let it cool while you gather the rest of your ingredients. In a medium bowl, whisk together flour, cinnamon, salt and 2 tablespoons of cooled coconut. In a separate medium bowl whisk your eggs and sugar together until thick and pale. Add milk and whisk to combine. Add the milk mixture, all at once, to the flour mixture and stir to combine. Mixture will be thin. Carefully pull the rack out of your oven and put the butter in the pan to melt. As soon as the butter has melted, swirl the pan so it coats the sides and bottom. Pour the pancake batter over the melted butter and immediately return to the oven. Bake for 15-18 minutes, or until browned and puffed along the sides and center of the pan. While the pancake bakes prepare any fruit you would like to serve with it, banana and pineapple go really well!. Once baked, remove from the oven and top with your choice of fruit and remaining toasted coconut. Slice into thick wedges, served with syrup of your choice.

*To speed up getting your eggs to room temperature, place them in a container of warm (not hot) water. In just a couple of minutes they will be room temp!

Buttermilk Blueberry Muffins

I am one of those people that loves having buttermilk in the fridge, but can never seem to use all of it before it expires. Such a happenstance occurred last month and I googled the best way to use up a lot of buttermilk. This recipe popped up because it uses a whole cup of buttermilk and who doesn’t love a blueberry muffin. This recipe is a winner in so many ways, but I think my favorite part is the way these muffins bake up. Because you fill it to the top of the pan with batter, you get this beautiful looking muffin that you can’t help but want to eat.

  • 2 1/2 cups all purpose flour
  • 3/4 cup granulated sugar
  • 1 1/2 teaspoons baking powder
  • 1/2 teaspoon baking soda
  • 1/4 teaspoon salt
  • 2 teaspoons nonfat dry milk powder*
  • 1 cup buttermilk
  • 1/2 cup oil
  • 2 eggs
  • 1 1/2 teaspoons vanilla extract
  • 1/2 cup blueberries, fresh or frozen
  • coarse sparkling sugar to taste

Preheat oven to 400 degrees. Line a standard size muffin tin with parchment paper liners and spray each one with nonstick spray for baking (If the muffins are just for your family to save time just generously spray your muffin tin with baking spray). In a large bowl, mix together flour, sugar, baking powder, baking soda, salt and nonfat dry milk powder. In a small bowl, whisk together buttermilk, oil, eggs, and vanilla extract until smooth. Gradually mix the buttermilk into the flour mixture, stirring gently and being careful not to over-mix. Gently fold the blueberries into the batter. Use a large scoop to divide the batter evenly into each muffin well. They will be filled to the very top. Sprinkle generously with sparkling sugar! Bake for 22-26 minutes, or until a toothpick inserted into the center of the muffin comes out clean. Cool for 5 minutes in the pan and then transfer to a cooling rack. Store in an airtight container.

*I have started adding nonfat dry milk powder to all my baked goods and it adds just a little something something to my desserts. It is entirely optional though so if you don’t have any the muffins will still be delicious.

PB&J Scones

Another scone recipe! Are you ready? If you are like the rest of my family and not as excited about scones as I am that’s okay, I have enough excitement for all of us. This scone had the perfect balance of peanut butter to jam, although I would recommend using a thicker jam, a la Bonne Marie, so it doesn’t get lost in the center.

  • 2 cups all purpose flour
  • 2 teaspoons baking powder
  • 1/2 cup brown sugar
  • 1/2 teaspoon kosher salt
  • 1/2 cup cold, salted butter, preferably frozen
  • 1/2 cup + 2 tablespoons heavy cream
  • 1/4 cup peanut butter
  • 1/2 cup peanut butter chips
  • 1/4 cup jam of choice

Preheat oven to 425°. Line a baking sheet with parchment paper and set aside. In a large bowl whisk together the flour, baking powder, sugar and salt. Set aside. Grate the frozen butter on a box cheese grater, then mix into your dry ingredients. Add in the peanut butter chips. In a medium bowl whisk together 1/2 cup heavy cream and peanut butter. Make a well in the center of the dry mixture and pour the wet ingredients into the well. Mix the dough together using a wooden spoon or rubber spatula. It should have a slightly dry texture and hold together, but not be crumbly. Add an additional 1-2 tablespoons of cream if the dough seems too dry. Place the dough onto a lightly floured work surface and make two balls. Flatten each ball into a circle about 2/3 of an inch thick. Spread a layer of jam onto the bottom disk, making sure to leave about 1/2 an inch border around the outside edge of the circle. Using a knife or a pizza cutter, cut the dough into 8 wedges. Place the wedges onto the prepared baking sheet and sprinkle with turbinado sugar. Bake for 15-20 minutes, or until lightly golden.

Chocolate Peppermint Scones

Last Christmas I bought some Ghirardelli peppermint baking chips but hadn’t even opened the bag all year. As we have gotten into fall I’ve been craving those holiday-esque flavors, and with my current scone obsession I wanted to try a scone using them. I’m really pleased with how this scone turned out, it was my first foray into cobbling together my own recipe based on what end result I was hoping to achieve and it turned out tasty!

  • 2 cups all purpose flour
  • 1/2 cup cocoa powder
  • 1/2 cup white sugar
  • pinch of salt
  • 1 stick unsalted butter, cold and cut into small cubes
  • 2 teaspoons baking powder
  • 1 cup peppermint baking chips
  • 2 large eggs
  • 1/2 cup heavy cream (you may need 1-2 tablespoons more depending on how the dough comes together)
  • additional white sugar for sprinkling on top of the scones

Preheat your oven to 400° and line a baking tray with a baking mat or parchment paper. Place flour, cocoa, sugar, salt, baking powder in a large bowl and whisk to combine. Grate the cold butter on a box grater and mix into the dry ingredients. Add the peppermint chips and stir very briefly to evenly distribute. Place the eggs and 1/2 cup heavy cream into a bowl and beat lightly with a fork. Add the egg mixture into your flour mix and stir gently, until a soft, crumbly dough forms. You want it to hold if you press the dough together, but not be sticky and wet. If the mixture is still too crumbly, add in the extra cream, 1 tablespoon at a time. (I live at altitude and added 2 tablespoons and probably could’ve added one more.)  Tip the dough onto your prepared baking tray and press into a large disc, around half an inch thick. Use a sharp knife or pizza cutter to cut the disc of dough into 6-8 wedges. At this stage you can leave the scones cut but together, or use a spatula to spread the scones around the baking tray with a 2 inch gap in between each one. Sprinkle some white sugar onto the top of each scones and then place in the oven for 13-17 minutes. (I left mine in a round for about 14 minutes because my mixture was pretty crumbly, then I separated them and baked for about 5 more minutes. You’ll know they are done when they are risen, golden around the edges and sound light when you tap on the top.

Blueberry Lemon White Chocolate Scones

One of my best friends in the world loves blueberry lemon desserts. When I started making batches and batches of scones, she requested one with that flavor combination and I knew exactly which recipe I would use as a base. This recipe is based on the cranberry white chocolate scones on my site and with the addition of lemon extract they turned out really well. Because I don’t put a glaze on my scones, it is very hard to get a prominent lemon flavor from juice alone, so I added lemon extract and it did the trick.

  • 2 1/2 cups all purpose flour
  • 3 tablespoons white sugar
  • pinch of salt
  • 1 stick unsalted butter, cold and cut into small cubes
  • 2 teaspoons baking powder
  • 1 cup white chocolate chips/chunks
  • 1 cup fresh or frozen blueberries; frozen won’t leak as much into the batter
  • 2 large eggs
  • 1/2 cup heavy cream (you may need 1-2 tablespoons more depending on how the dough comes together)
  • 3/4 teaspoon lemon extract
  • additional white sugar for sprinkling on top of the scones

Preheat your oven to 400° and line a baking tray with a baking mat or parchment paper. Place flour, sugar, salt, baking powder and cubes of butter into a large bowl and rub the butter into the flour with your fingers until you have a coarse breadcrumb texture. Some pea sized lumps of butter is fine. (I was using frozen butter so I grated mine with a cheese grater.) Add the white chocolate chips and blueberries and stir very briefly to evenly distribute. Place the eggs, heavy cream and extract into a bowl and beat lightly with a fork. Add the egg mixture into your flour mix and stir gently, until a soft, crumbly dough forms. You want it to hold if you press the dough together, but not be sticky and wet. If the mixture is still too crumble, add in the extra cream, 1 tablespoon at a time. (I live at altitude and added 2 tablespoons and probably could’ve added one more.)  Tip the dough onto your prepared baking tray and press into a large disc, around half an inch thick. Use a sharp knife or pizza cutter to cut the disc of dough into 6-8 wedges. At this stage you can leave the scones in a circle, or use a spatula to spread the scones around the baking tray with a 2 inch gap in between each one. Sprinkle some white sugar onto the top of each scones and then place in the oven for 13-17 minutes. (I left mine in a round for about 14 minutes because my mixture was pretty crumbly, then I separated them and baked for about 5 more minutes. You’ll know they are done when they are risen, golden around the edges and sound light when you tap on the top.