 Maybe it’s the cold getting to me, or maybe I’m just ready for spring, but I’ve been craving lemon desserts. After much searching of the Pinterest, I came across this bundt cake recipe. It came together so nicely and has a wonderful lemon flavor, while not being too overpowering. Make it today! Recipe courtesy of sprinklesomesugar.com
For the Cake
- 2 1/4 cups all-purpose flour
- 2 1/4 tsp baking powder
- 1/2 tsp salt
- 4 eggs
- 2 cups sugar
- 1 tsp vanilla extract
- 2 tbs lemon zest
- 2 tbs + 2 tsp lemon juice
- 1 1/4 cups whole milk
- 10 tablespoons unsalted butter, cubed
For the Glaze
- 1 1/2 cups powdered sugar
- 3-5 tbs lemon juice
For the Lemon Sugar
- 1 tbs lemon zest
- 1 tbs granulated sugar
Preheat oven to 350 degrees Grease a bundt pan very well making sure to really get into all crevices then lightly flour pan. Set aside.
Lightly whisk flour, baking powder and salt in a small bowl and set aside. In the bowl of your stand mixer (if you’re using one) fitted with the paddle attachment, beat eggs on low until they are thickened and very pale yellow in color. Turn mixer on low and slowly add sugar to running mixer and beat on medium-high speed until light and fluffy. Stir in vanilla, lemon juice and lemon zest. Slowly pour in dry ingredients on low speed until combined.
In a small saucepan, heat milk until very hot and butter is just melted. Do not boil and whisk the mixture to help the butter along. Pour into batter and mix until smooth. Batter will be very thin. Pour into prepared baking pan and bake for 27-35 minutes or until a toothpick inserted into the center comes out with a few moist crumbs. Once done, remove cake from oven and allow to cool for 5 minutes in pan. Release the sides of the cake with a butter knife to ensure it isn’t going to stick. Turn cake onto a large round platter or cake stand. (If using a 9×13 pan, do not remove cake, just place entire pan onto wire rack so underneath the pan can cool also.) Allow cake to finish cooling until warm to the touch.
While cake is cooling, prepare lemon sugar and glaze. For the lemon sugar, thoroughly mix the lemon zest and sugar together and let it sit for 5 minutes. If you don’t want the lemon zest on top of the cake, push the sugar through a fine mesh strainer, separating the two and discard the zest. If you don’t mind the zest on top of your cake (it will give it a nice pop of color!), then just set the mixture aside.
For the glaze, whisk powdered sugar and lemon juice, using more or less lemon juice as needed to get desired consistency. (I like to keep mine slightly thick so it won’t thin out too much when I serve it over warm cake.)Once cake is cooled down slightly, drizzle glaze over warm cake. Alternately, you can drizzle the glaze over each individual piece being served. Sprinkle lemon sugar on top.
Cake will stay soft and moist for 3 days stored in an airtight container.
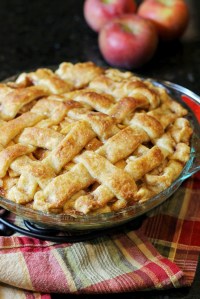
 This was the second homemade pie crust I have made at Thanksgiving and I was so pleased with how it turned out. I used to be terrified of making my own crusts, but with practice and step by step directions it has gotten much better. Not to mention I truly believe the pies taste better with a homemade crust. This one differs from the other on my site in that it uses shortening and butter, instead of all butter. Next year I’ll have to make a batch of each and see which one I like better. Recipe and photo courtesy of sallysbakingaddiction.com
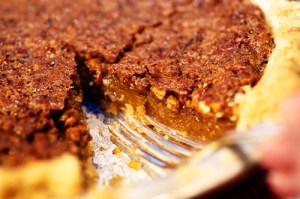
 This pie was a huge hit this Thanksgiving, partly because of the surprise ingredient this recipe has. I was very interested to see what it would taste like and it delivered on all counts. My good friend said it was the best pumpkin pie she’s ever had, and she has tried A LOT of pumpkin pies over the years. Recipe and photo courtesy of sallysbakingaddiction.com
 I had seen this cake a couple of times over the years and was intrigued by the fact that it didn’t contain eggs, butter or milk. It was developed during the Great Depression when those dairy items were in short supply. The cool thing about this cake is that you don’t even necessarily need a mixing bowl, just the pan you bake it in. I paired it with a One Minute Frosting and I thought it was a completely satisfying chocolaty cake. Recipe and photo courtesy of chocolatechocolateandmore.com


