 This key lime pie is the ultimate in key lime decadence. It was just the right balance of tart and sweet and the crust was so so good. As this recipe calls for almost 2 cups of key lime juice, I would really recommend buying a bottle of key lime juice. I found mine at my local Kroger in the juice section and it really made a difference. This recipe has a LOT of steps, but please don’t be intimidated by that. No step is difficult, and I actually made my crust and the no bake/chilled layer the day before and finished it the day I wanted to serve it.
Cinnamon Brown Sugar Crust
- 2 1/2 cups graham crackers crumbs
- 1/4 cup dark brown sugar
- 1 teaspoon cinnamon
- 1 stick melted butter
- 1-2 tablespoons egg whites, room temp
The Baked Layer
- 2 14 ounce cans sweetened condensed milk
- 1 cup of key lime juice
- 8 egg yolks, room temp
- 1/2 cup sour cream, room temp
The Chilled Layer
- 8 oz cream cheese, softened
- 1/2 cup sweetened condensed milk
- 1/4 cup key lime juice
- 1/4 cup sour cream, room temp
- 2 tablespoons granulated sugar
The Whipped Layer
- 1 1/2 cups heavy cream, very cold
- 2 tablespoons sugar
- 2 tablespoons key lime juice
To prepare the pan, place parchment paper on the bottom of a 10″ spring form pan. Set the “ring” of the spring form on top of the parchment paper and close to seal around the bottom of the spring form. Trim the parchment paper on the outside as close to the pan as you can get. This will ensure that you can lift the pie off the bottom of the spring from pan with ease. Wrap the outside of the spring from pan in aluminum foil to prevent any leakage during baking.
Next, in a very large bowl, combine and toss the graham crackers, dark brown sugar and cinnamon. Make a well in the middle of the dry mixture. Start adding the melted butter into the well and with either a wooden spoon or by hand incorporate the melted butter into the dry mixture. Add butter until you can pinch the dry mix together and it will hold together. Add the egg whites to the mixture and mix well. Once the egg whites are added, you need to work quickly to move the prepared crust mixture in to the spring form and form the crust or the mixture will start to dry out. Working from the bottom of the spring form, move the crust mixture around to cover the bottom first. Work the crust mixture up the sides of the spring form all the way to the edge of the ring. Use either the bottom of a glass or dry measure cup to press down on the bottom, sides and especially where the bottom of the pan and sides come together. This will help you achieve a nice even and packed crust. Move to the oven and bake for 15 minutes.
While the crust is baking, add the 8 egg yolks to a large glass bowl. Using a wire whisk, whisk the yolks for about a minute. You will want the yolks nice and creamy with some air incorporated into them. No need to break out the mixer for this step. Just some good ole whisking by hand will do. Add the 2 cans of sweetened condensed milk to the mixture and continue to whisk until well blended. Add the room temperature sour cream (1/2 cup) to the mixture and whisk. The sour cream, if not at room temperature will clump, so make sure this and all ingredients are at room temp. Pour the key lime juice into the mixture and continue to whisk. You will notice that the mixture will begin to slightly thicken. This is the reaction of the acid in the key lime juice and the sweetened condensed milk. Whisk the mixture until well blended. You will see lots of air bubbles and that’s okay too. Pour this mixture into the crust that is just coming out of the oven and with either a spatula or the back of a spoon spread evenly over the bottom of the spring form. Bake in the 350-degree oven for 20 minutes. The baked layer will set up and be set all the way thru to the center. Remove from the oven and cool completely before adding the chilled layer. Do Not refrigerate until the baked layer has completely cooled or you will introduce moisture to the crust and cause it to separate.
To make the no bake, chilled layer, cream the 8 ounces of cream cheese and 2 tablespoons of granulated sugar until fluffy. Add the room temperature 1/4 cup of sour cream. Remember cold sour cream will make lumps! Mix well. Add the 1/2 cup of sweetened condensed milk and mix well. Add the 1/4 cup of key lime juice and mix well. Move to the completely baked and cooled baked layer. Use a spatula or spoon to smooth over layer one. Be sure to leave room for the key lime whipped topping, the chilled layer should only come up to about 3/4 to the top. Chill in the refrigerator while you make the key lime whipped cream.
The final layer is the key lime whipped cream. Add the whipping cream to a clean and preferably chilled bowl for mixing. I chill both the bowl and the beaters when making whipped cream. Add sugar and whip until you have soft to medium soft peaks. Do not whip to stiff peaks. Begin adding the key lime juice, this will cause the mixture to thicken. Add the key lime juice a little at a time to get the consistency you prefer. Spread over the pie and refrigerate for a couple of hours before serving.
 Now I know that this pie has a rather unappetizing name, but take a chance and make it. It is anything but dry and crumbly and is so incredibly simple to make. I feel like it is pecan pie’s crazy country cousin.
 The final pie I made this past week was a chocolate cream pie. To me, it is the quintessential cream pie, and this one was perfect. I think store-bought pudding mixes have a odd aftertaste to them, but this one is made from scratch and tasted amazing. I also used my
  I love a homemade whipped cream, but they can be pretty fragile if not eaten right away. That was the problem I was looking to solve this past week when I had 3 pies needing whipped cream that weren’t going to be eaten for several hours. After much internet scouring, the consensus seemed to be adding gelatin to the whipped cream to help it last. After trying it I can say without doubt that it was successful. The cream still tasted great, and held up beautifully.
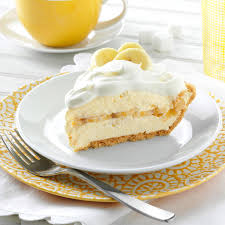 Here is another of the cream pies I made for my fellow firefighters. I am not historically a big fan of banana flavored desserts, but this one got a big thumbs up from my co-workers. It was also my first time making my own creme anglais and I was really pleased that it came out. I made it with a vanilla wafer crust instead of a graham cracker crust but either will work just fine. Recipe and photo courtesy of chef-in-training.com.
 When I served this pie to my fellow firefighters the first reaction was, “wow, this stuff is crack”. I took that as a compliment. The beautiful thing about this pie is that it is no-bake (if you use a store-bought crust), and only 4 ingredients. It was completely delicious. Recipe and photo by plainchicken.com
 Every month at my fire department association’s business meeting the firefighters take turns bringing a dessert or snack. This month was my turn and when I asked around what people might want the answer I got was cream pies. So I decided to make four different types of cream pie in hopes of having something for everyone. This lemon cream pie was chosen because I love all things lemon and it looked so good, I just had to try it. I had never made my own curd before so it was a little dicey for a bit as I kept stirring and stirring waiting for the curd to thicken, but eventually it did and it was heavenly. Recipe inspiration by wellplated.com.
 I’ve been a new recipe kick for a little while now, and the other night when I was restless seemed the perfect time to try another. This time it was banana blondies. I don’t typically make banana desserts other than banana bread because for some reason I think they will taste artificial, which is never good. I decided to break out of my comfort zone and try this blondie recipe because when I looked at the ingredients I knew that it couldn’t possibly taste artificial. The original recipe came from cookiesandcups.com, but instead of using the browned butter frosting, I thought it would be delicious with a peanut butter frosting and boy was I right.
 There are so many recipes out there that claim to be THE BEST. That definition is so different for everyone, especially when it comes to chocolate chip cookies. Some people say that chilling is mandatory, or cake flour, or nuts…the list goes on and on. In my opinion, this is the best chocolate chip cookie recipe I have tried to date. There is no chilling, no super fancy ingredients, but there are a couple steps in here that I feel make this recipe stand out. One is the extra egg yolk. The other is the 4-5 minutes of beating before you add the dry ingredients. I did add about 25 grams more flour to compensate for being at altitude and I have included the US measurements in case you don’t own a food scale. I did weigh my ingredients so keep that in mind when you try this. Recipe and photo courtesy of janespatisserie.com.
 I just love watching baking shows, in particular, baking competitions. One item that inevitably comes up in every competition is cream puffs. Cream puffs are made with a special dough called pate a choux. I have always been intrigued by the preparation method of this dough and finally decided to give it a try. Although the name and directions look intimidating, it came together really easily! I will definitely be making these again. Recipe and photo courtesy of barbarabakes.com